Make a men's neck tie quilt
Creating a quilt from men's neckties is not just a creative and unique way to repurpose old ties, but it also holds sentimental value. Whether you're preserving the memory of a loved one or simply transforming a collection of ties into a functional piece of art, a necktie quilt can be a beautiful addition to your home. This project allows you to blend various patterns, colors, and textures into a cohesive design that tells a story. In this blog post, we'll guide you through the process of making a men's necktie quilt, from selecting the ties and preparing the materials to piecing together your quilt top and finishing your creation. Let’s get started on this meaningful and enjoyable quilting journey!
What you need
- Dresden ruler
- Stabilizer
- Background fabric
- Batting
- Backing
- Quilting ruler
- Thread to match your fabric
- Fabric spray glue
- Pins
- Quilting pins
- Applique paper
- Steam Iron
- Wonder clips for binding
Guidelines
First, thoroughly wash the ties. Ensure they are free from stains, and take this opportunity to shrink the fabric by using the hottest washing cycle available and then drying them in a tumble dryer. Washing them twice can be beneficial, especially if they have been stored for a while before starting your quilt project.
Next, you'll need to disassemble the ties to use in a Dresden design (if you’re following my pattern). Gather a seam ripper and plenty of patience. Ties are typically sewn together with a single long thread (except at the bottom end). Once you locate this thread, pulling it will allow you to easily take the tie apart.
For this project, I recommend using a Dresden ruler. It simplifies the process compared to drawing your own template, which can be time-consuming and difficult to perfect. You can find Dresden rulers at most craft stores or online.
When choosing the size of your ruler, consider how many ties you plan to use. The rulers come with various angles to determine the number of "blades" in your design, so this will help you decide on the appropriate size for your project.
Let's get making!
Take the ties apart.
A tie has a label that you remove, it also has an inner padding type of fabric. I kept that as it looks like something that could work as a stuffing for another project.
You also need to take out the lining fabric at the lower point of the tie. I didn’t bother taking the thin side apart and just cut that end off.
Ties are made from a variety of fabric varying from pure silk to polyester and any other fabric in between.
To make sure that I didn’t get any weird stretch, and that the ties were all stable, I added an iron-on stabiliser.

|
Ties are made from a variety of fabric varying from pure silk to polyester and any other fabric in between. To make sure that I didn’t get any weird stretch, and that the ties were all stable, I added an iron-on stabiliser. |
 |
We’re getting ready to create the fans for our dresden plate.
|
 |
To get the point, fold the bottom edge of the blade and stitch together. I chain stitched to make it quicker. |
 |
Clip the corner so that you have a nice flat corner when you turn it out. |
 |
I pressed the seam open, using pins to pin them open first. The clipped corner also helps with this. |
 |
You may notice that you could end up with uneven sides, and again the dresden ruler came into play. I have a central line on my ruler so I aligned the point and the seam with that line. |
 |
Arrange the ties so that you can determine what the right order for stitching will be. You may have some duplicates that you don’t want next to each other. I had some very similar ones that have the same logo but different colour and I didn’t want them next to each other. You will also notice the different styles of ties – some are cartoon characters, some are really bright, and others are more plain. Arranging them first to take a look gives you a better impression of the final product. |
 |
We’re now getting to the construction of the plate. Starting at the bottom end, stitch the blades together in the order that you determined. You start at the bottom end so that you can compensate for any unevenness in the middle. It will be covered by the centre circle. After every seam, press the seam in your preferred manner. I made sure that the seam was flat, but to one side. It’s easier to press as you go than to wait until you have multiple seams done. I also did my blades in batches so as to reduce the bulk around my machine. |
 |
Stitch the different parts together so that you have your plate. You may notice some unevenness as a result of inaccurate stitching – I am by no way a perfectionist when it comes to this, so I too had unevenness to sort out. Some unpicking and restitching in the centre helped reduce any issue I had at this point. |
 |
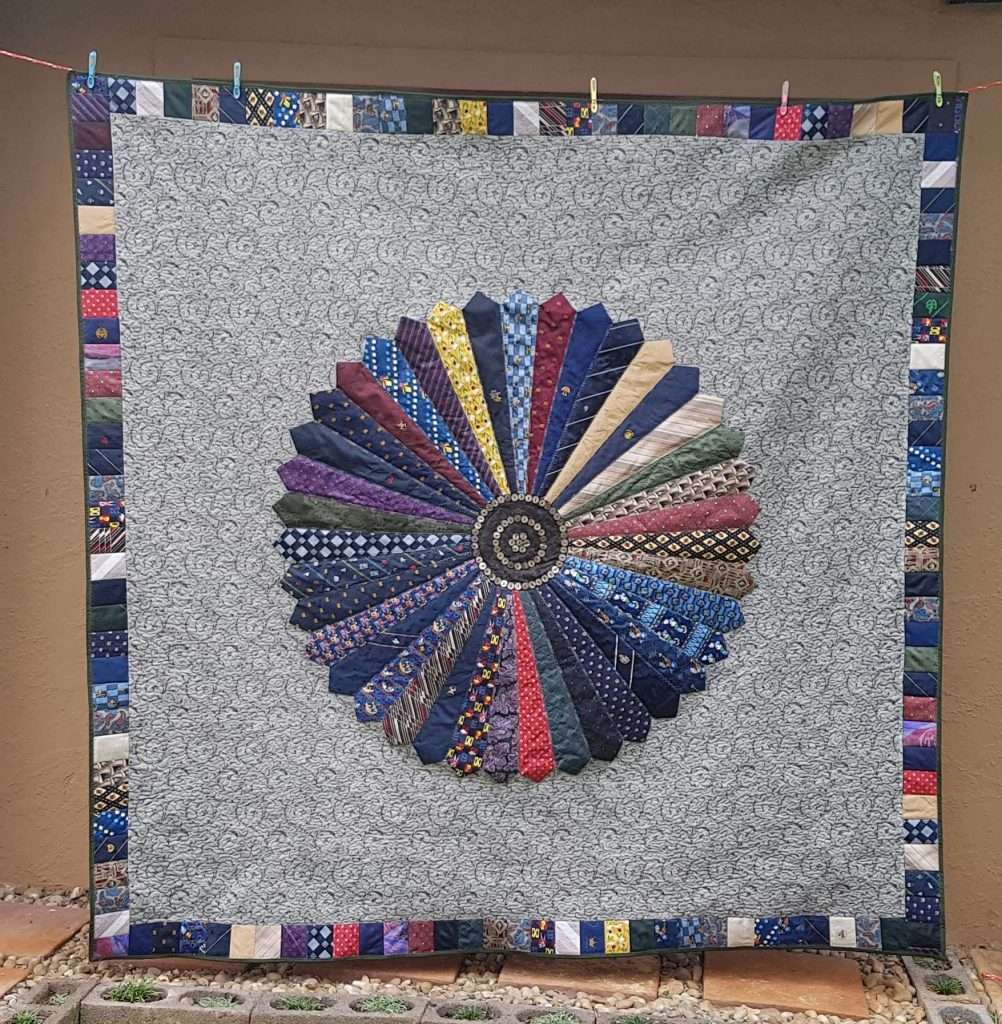
Use whatever you have at hand to tidy the centre circle of your dresden. I took a salad bowl, marked around it with tailors chalk and cut it neatly with a fabric scissor. I didn’t trust my rotary cutter over the seams, as it was bulky and uneven which could make it slip. Now for the tricky part. I have a 1,25m dresden plate to appliqué to a background. Not an easy thing to do.I chose my background fabric and cut it to 2 x 2 m. Fold this in quarters to determine the centre. I drew lines for the quarters all the way across the stretch of the fabric to align my blade points to. I did this at my dining room table, since my cutting table was simply not big enough for this. |
 |
Spray the back of the dresden plate with spray adhesive, and align the centres to the markings on the background. Smooth it down. I pinned the two layers and then hand basted. It seems like a lot of work, but considering what you’re working with, and that this still needs to be quilted, I think it’s worth it. An alternative suggestion is to use heat ‘n bond, like you would for other appliqué and attach the layers in this manner.
|
 |
Using appliqué paper, or your preferred appliqué method, draw a circle big enough to cover the centre of your dresden. Press the appliqué paper to the back of the fabric that you have chosen for the centre and then cut it out. |
 |
To attach it to the background, I used my walking foot and straight stitched in the ditches between the ties. After this, I draped it over my quilting frame, to slip stitch the pointed ends of the ties to the background. Your quilting frame is not only for quilting! It comes in handy for other things too. Now you can press the circle to the centre of the dresden using the markings you already have for the placement of the dresden. I folded my circle in four and placed the point in the middle, then pressed to the backing and over the ties. I then stitched it to the ties so that the dresden plate is complete. |
 |
Using the same method as the dresden plate, I cut rectangles from stabiliser and pressed it to the back of the fabric. |
 |
Cut these out, and stitch together for each side. Attach it to the quilt top. |
 |
If you have a quilting frame, add your layers to your frame to prepare for quilting. If you don’t, you will now setup your quilt sandwich to prepare for quilting. I quilted a stipple meander around the dresden plate, and then added decorative stitches between the blades. Finally, bind your quilt, add your label and put it on display! |
1 comment
Great idea and instructions! I am starting to do a commissioned memory quilt of her father’s ties for my customer.